Creating a tool organization wall can transform your workspace from chaotic to streamlined, allowing you to find what you need in seconds. Imagine stepping into your garage or workshop and seeing all your tools neatly arranged and easily accessible. This guide will walk you through the process of building your very own tool organization wall, making it an enjoyable and rewarding DIY project.
Choosing the Right Wall Space
Start by choosing the right wall space. Look for an area that is both functional and visible, such as a blank wall in your garage or shed. Ensure it’s well-lit to help you easily identify your tools.
Gathering Your Materials
Next, gather your materials:
- Plywood or pegboard
- Screws
- Hooks
- Brackets
Pegboard is particularly advantageous due to its versatility; you can customize it to hold various tools simply by rearranging the hooks.
Measuring and Cutting
Once you’ve selected your materials, it’s time to measure and cut your pegboard or plywood to fit your designated wall space. Precision is key here; the better the fit, the more professional your organization wall will look. After cutting, attach the board to the wall using screws or brackets, ensuring it is secure and level.
Organizing Your Tools
Now comes the fun part: organizing your tools! Before hanging anything, lay out your tools on the floor to visualize how you want them arranged. Group similar tools together—hammers with hammers, wrenches with wrenches. This not only saves time but also enhances your workflow.
Use a variety of hooks, shelves, and bins to accommodate different tool sizes and shapes. The flexibility of pegboard allows you to get creative; consider adding labels for quick identification.
Benefits of a Tool Organization Wall
The benefits of having a tool organization wall are immense. It not only saves time but also reduces frustration when searching for tools. Plus, a well-organized workspace can spark creativity and increase productivity. You’ll find that maintaining an organized space encourages you to take on more projects and tackle home repairs with confidence.
Elevating Your Tool Organization
For those looking to elevate their tool organization game, consider adding a few extras:
- A magnetic strip for small metal tools
- A chalkboard section for jotting down project ideas
- A small shelf for frequently used items
These additions can make your organization wall not just functional, but also a focal point in your workspace.
Conclusion
In conclusion, building a simple tool organization wall is a satisfying project that yields long-term benefits. With just a few materials and a little creativity, you can create a space that inspires you to work smarter, not harder. Don’t wait any longer—get started on your tool organization wall today and unlock the potential of your workspace!
Related products
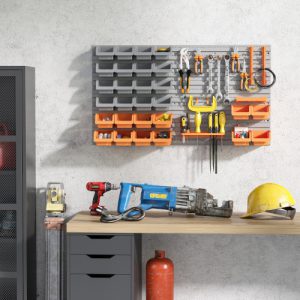
DURHAND 44 Piece Wall Mounted Pegboard Tool Organizer Rack Kit with Multiple Storage Bins, Pegboard, & Hooks in Vibrant Orange
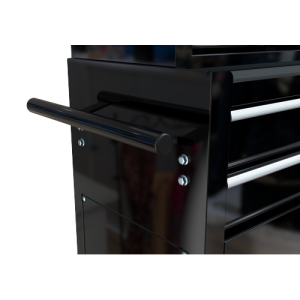
Durable Metal Tool Cabinets for Efficient Organization and Storage Solutions
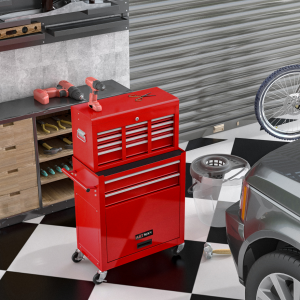
High Capacity Rolling Tool Box with Wheels & Drawers – 8 Drawer Tool Storage Cabinet for Ultimate Organization
